
Map icons 41 Destination entry 43 Previous destination 45 Address Book - destination entry 46 Point of Interest (POI) 48 Intersection 52 Freeway entrance/exit 53 Destination way points 55 Map preferences 57 Address Book - editing 59 Quick POIs 60 Avoid areas 60 Voice recognition 62
2007 (nv1) Supplement USA (fus)
All rights reserved. Reproduction by any means, electronic or mechanical including photocopying, recording or by any information storage and retrieval system or translation in whole or part is not permitted without written authorization from Ford Motor Company. Ford may change the contents without notice and without incurring obligation.
Copyright © 2006 Ford Motor Company 2007 (nv1) Supplement USA (fus)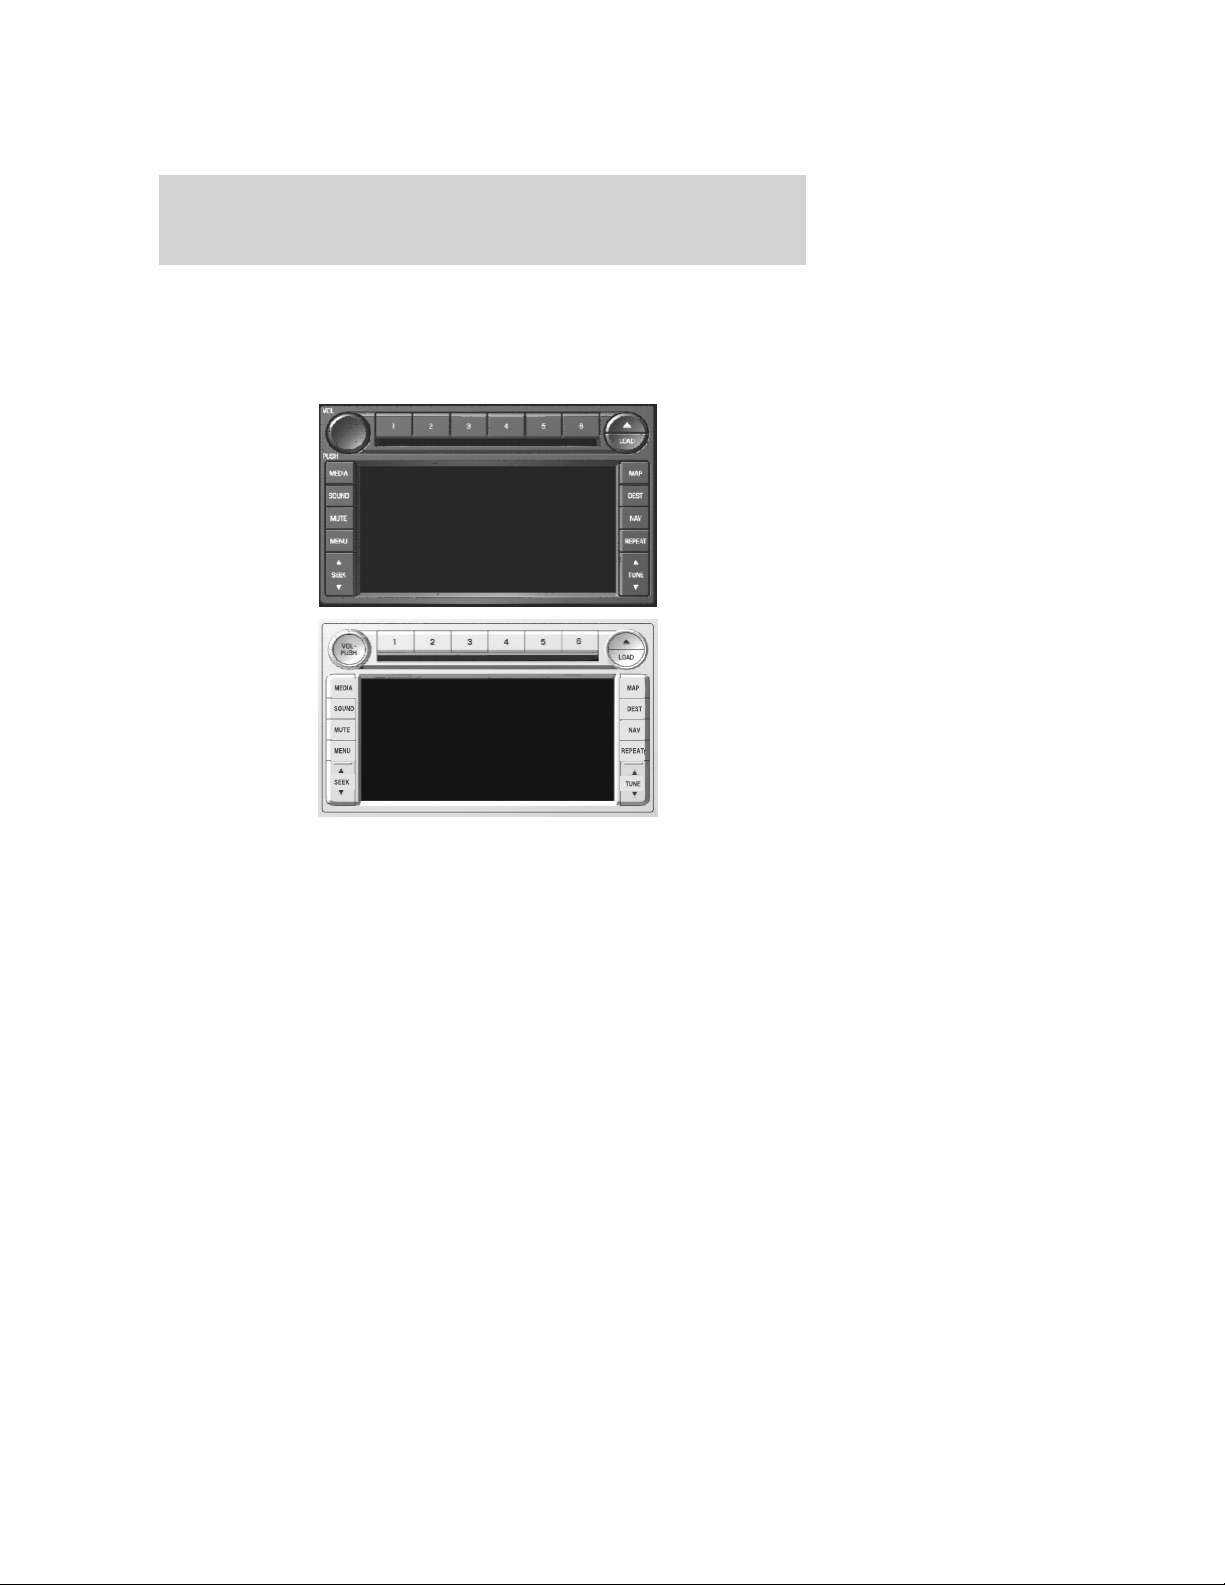
Your vehicle is equipped with a navigation system which allows you to listen to the radio, play CDs, and also navigate the vehicle using a navigation map DVD.
Your system has a large range of features, yet is easy to use. Guidance is shown on the display screen and is supplemented with voice prompts. The display screen provides full information for operating the system through the use of tabbed menus, text screens, and map displays. Screen selections are made by touching the desired selection on the touch screen.
2007 (nv1) Supplement USA (fus)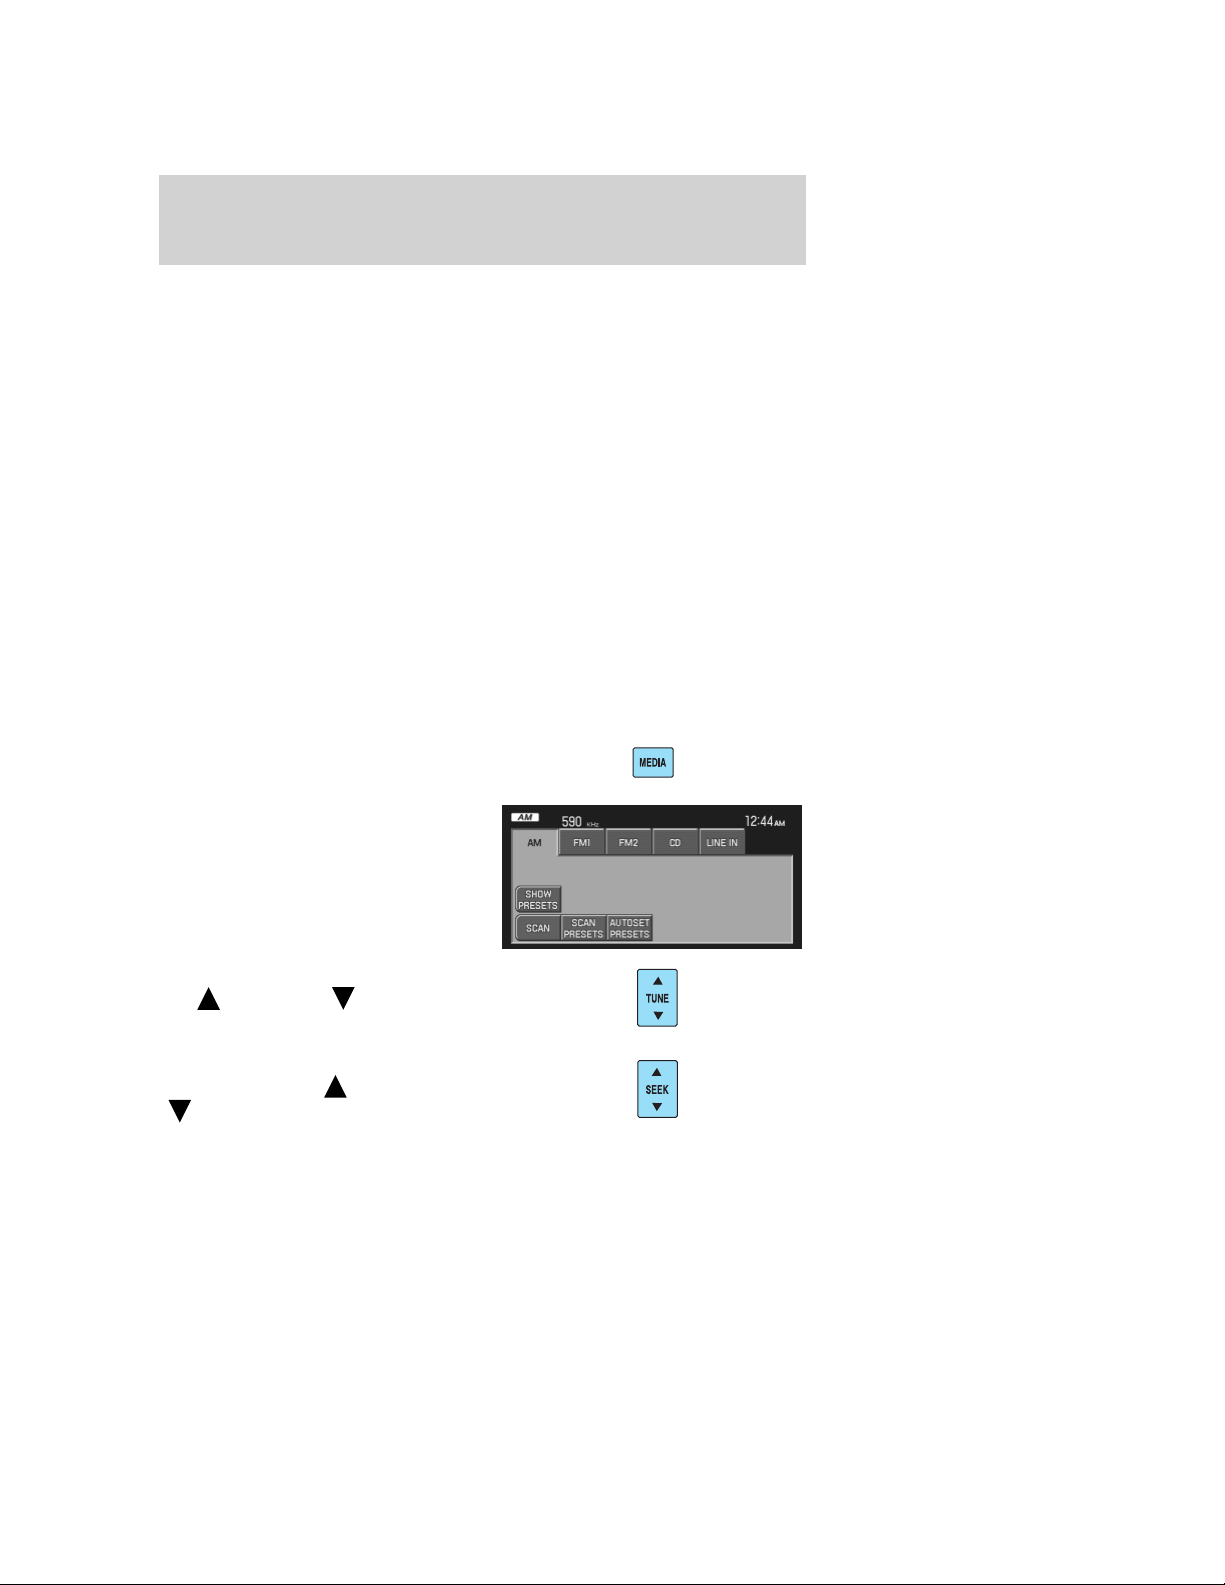
In order to prevent the navigation system from distracting the driver, access to certain functions are restricted when the vehicle is traveling above 5 MPH. (For example, only QUICK DEST (Destination) items are available for destination entry. Refer to Destination Programming ). When the vehicle is in motion, the following functions are restricted:
• Scrolling of long lists • Continuous scrolling of map • Editing/Adding entries in the Address Book and Avoid Areas List • DVD ROM Load and EjectWhen the vehicle begins to move, and the Select Route Screen is shown, the highlighted route is automatically selected and guidance begins. When the vehicle speed is reduced to 5 MPH or less, system restrictions are lifted and you have full access to the system.
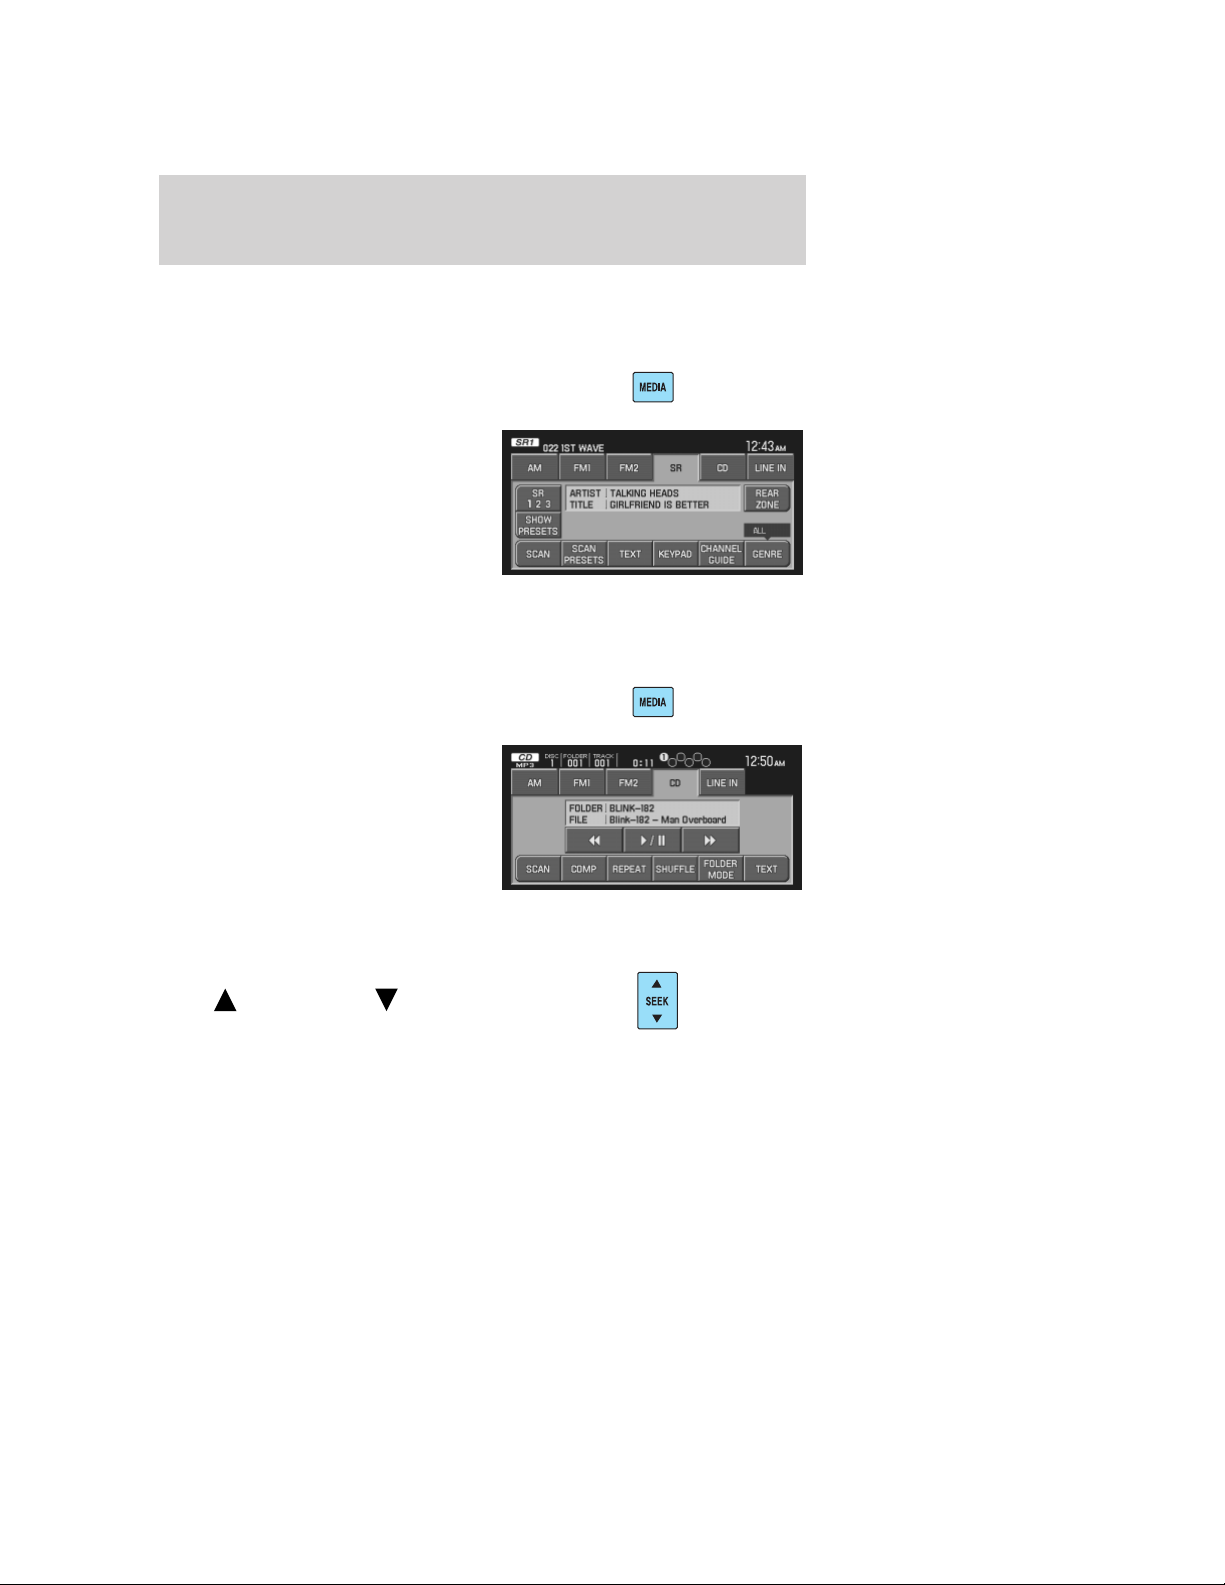
3. If your vehicle is equipped with Satellite Radio, the SR tab will be present on the media screen. Select the SR tab to enter Satellite Radio mode (if equipped).
For further information on Satellite Radio, refer to Satellite Radio in the Audio Features chapter.3. Select the CD tab or press MEDIA repeatedly until CD is highlighted. Press the corresponding memory preset (1–6) to select the desired CD. The previously loaded CD will begin to play. The system will begin playing the discs in order.
Note: If there are no CDs loaded into the system, NO DISC will display in the status bar and you will not be able to highlight or select the CD tab.
4. Press SEEK to advance to the next ( ) or previous ( ) tracks. 2007 (nv1) Supplement USA (fus)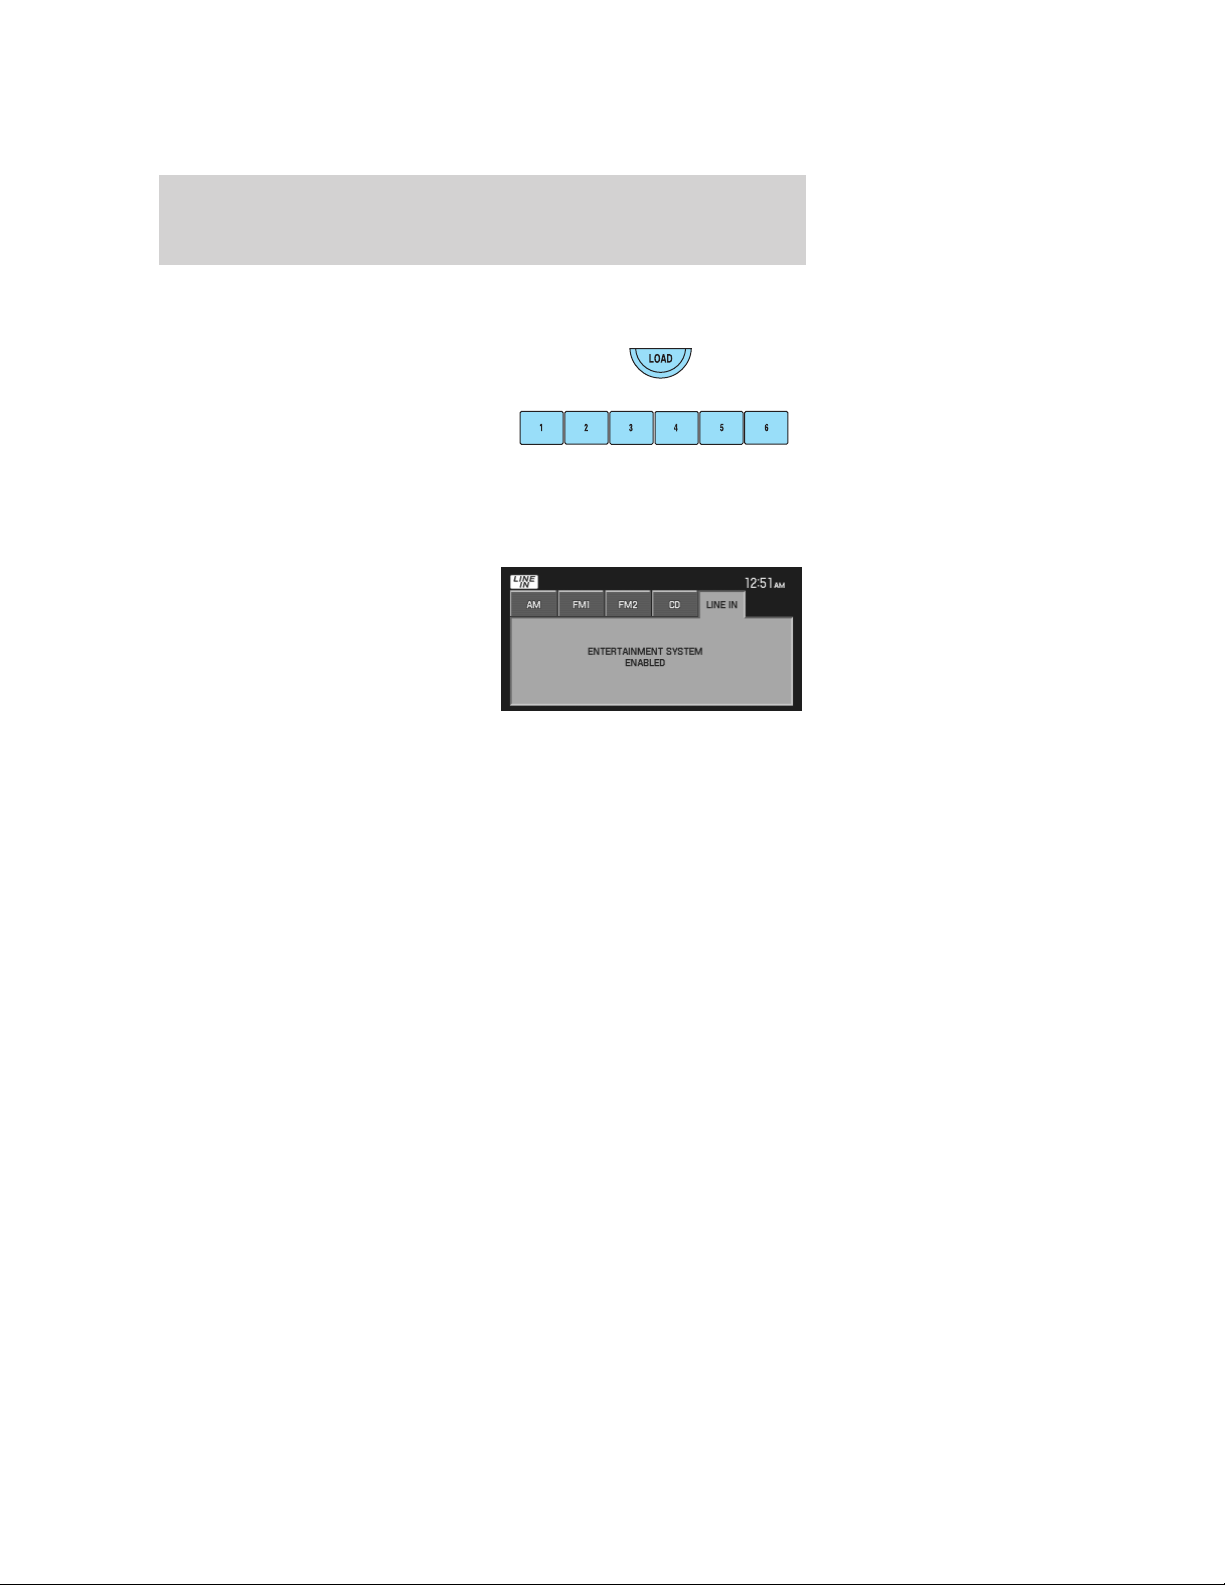
3. When LOAD CD (#) appears on the status bar, select the desired slot by pressing the corresponding memory preset (1–6.)
4. Insert the disc. The CD will begin to play.Your vehicle is equipped with an auxiliary input jack which allows a portable audio device to be listened to through your vehicle’s audio system. To access the auxiliary input jack mode:
1. Press the MEDIA hard button. 2. Select the LINE IN tab.Once a 3.5 mm input jack is plugged into the Line In jack, sound from the device will be emitted through the vehicle speakers.
For information on the auxiliary input jack location, please refer to Auxiliary input jack in the Entertainment chapter in your Owner’s Guide. 2007 (nv1) Supplement USA (fus)
1. Ensure that the vehicle ignition is on, and the navigation map DVD is loaded into the navigation map DVD player. If the navigation map DVD is not loaded, refer to Loading and ejecting navigation map DVDs in the System Features chapter for loading instructions.
2. Press DEST.3. Select the desired type of destination entry: Quick Destination, Previous Destination, Address Book, POI, Address (shown), Map, Phone Number, Intersection or Freeway Entrance/Exit.
4. Enter the required information. Please note that: • The system uses a Smart Speller, which facilitates entering information through the keyboard.• Accented characters in English, Spanish and French will be converted internally to non-accented characters for search purposes.
5. The screen will show the pointentered in a map. If this is the intended destination, press SET AS DESTINATION. COMPUTING ROUTE will display while the system is computing the route.
6. Select the desired route on theright hand side of the screen. There will be up to three routes possible from which to choose, each highlighted with a different color. For each route, the overall distance, route conditions and the estimated travel time are displayed.
7. Press START ROUTE and follow the instructions. 2007 (nv1) Supplement USA (fus)
Your navigation system is equipped with a voice activated feature that allows you to “speak” certain commands to the system. For further information, refer to Voice recognition in the Navigation chapter.
The ’tabs’ that appear across the top of the screen will vary depending on your vehicle’s options. For example, the ’SR’ tab will appear if your vehicle is equipped with Satellite Radio. The FM tab also varies; and will be represented as FM or FM1 and FM2 depending on your vehicle’s options.
2007 (nv1) Supplement USA (fus)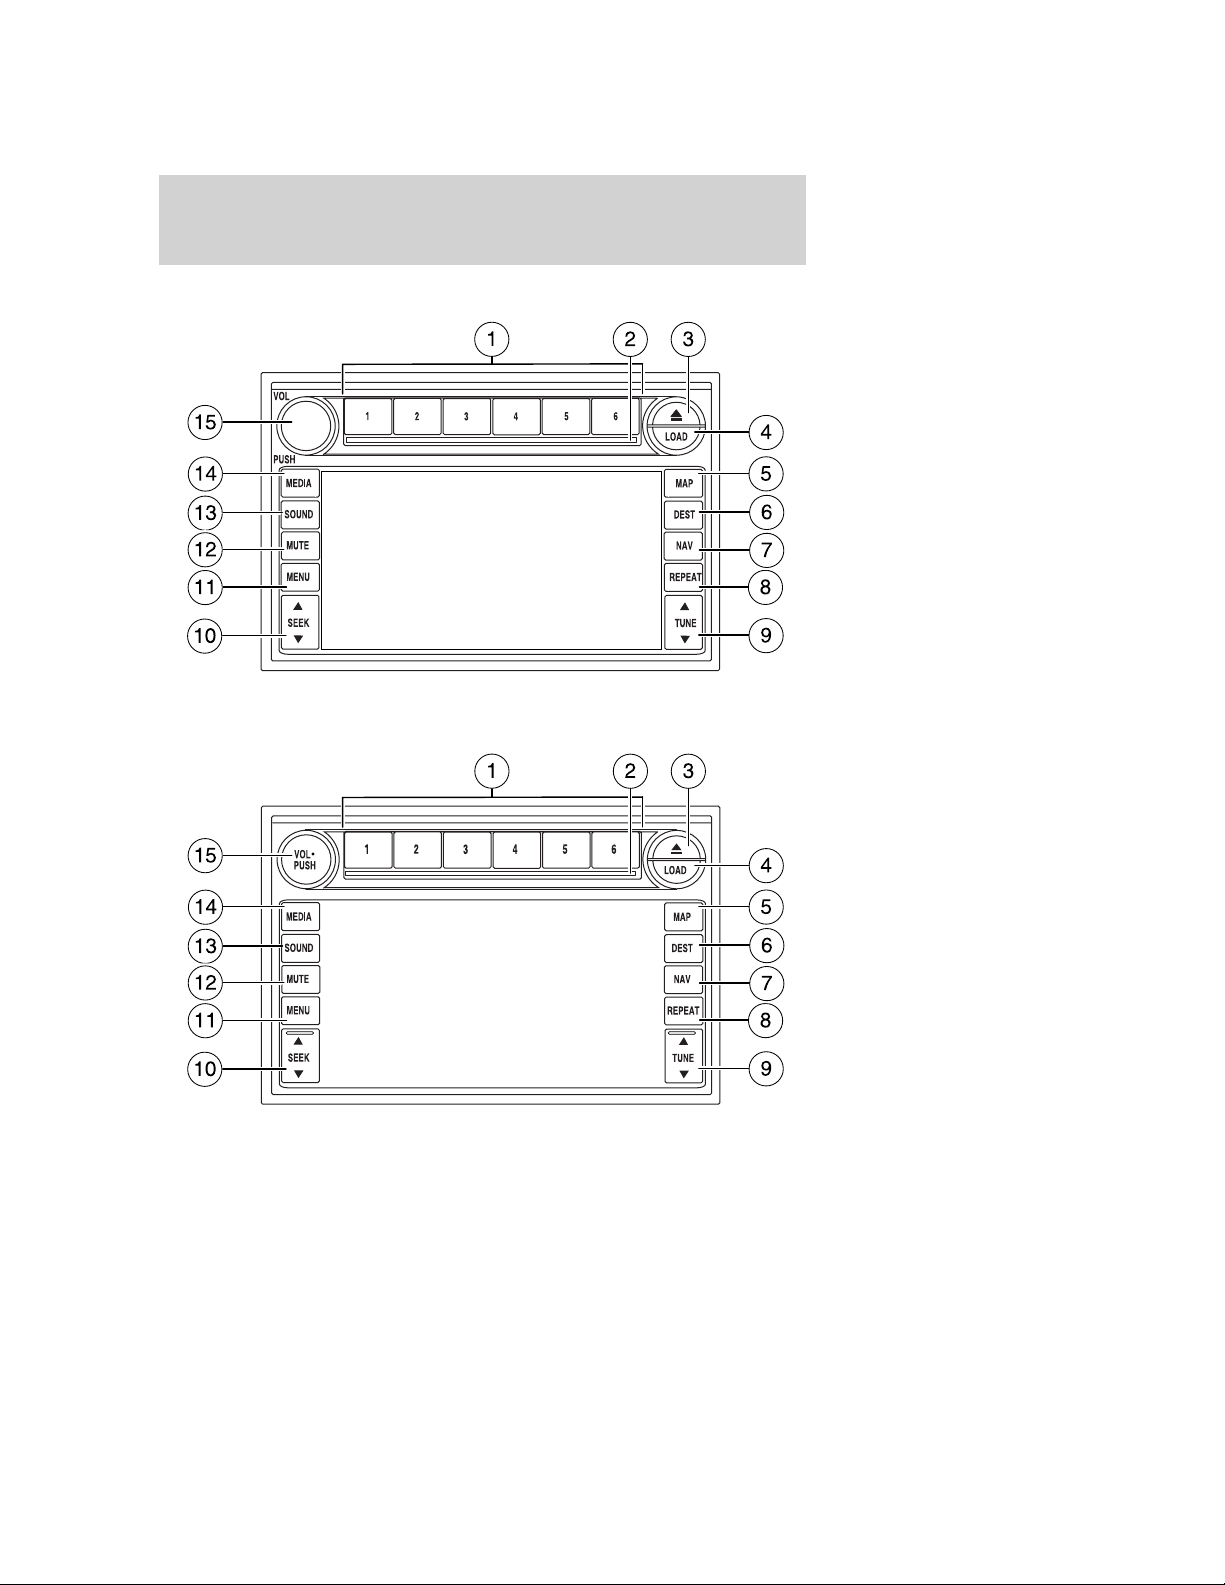
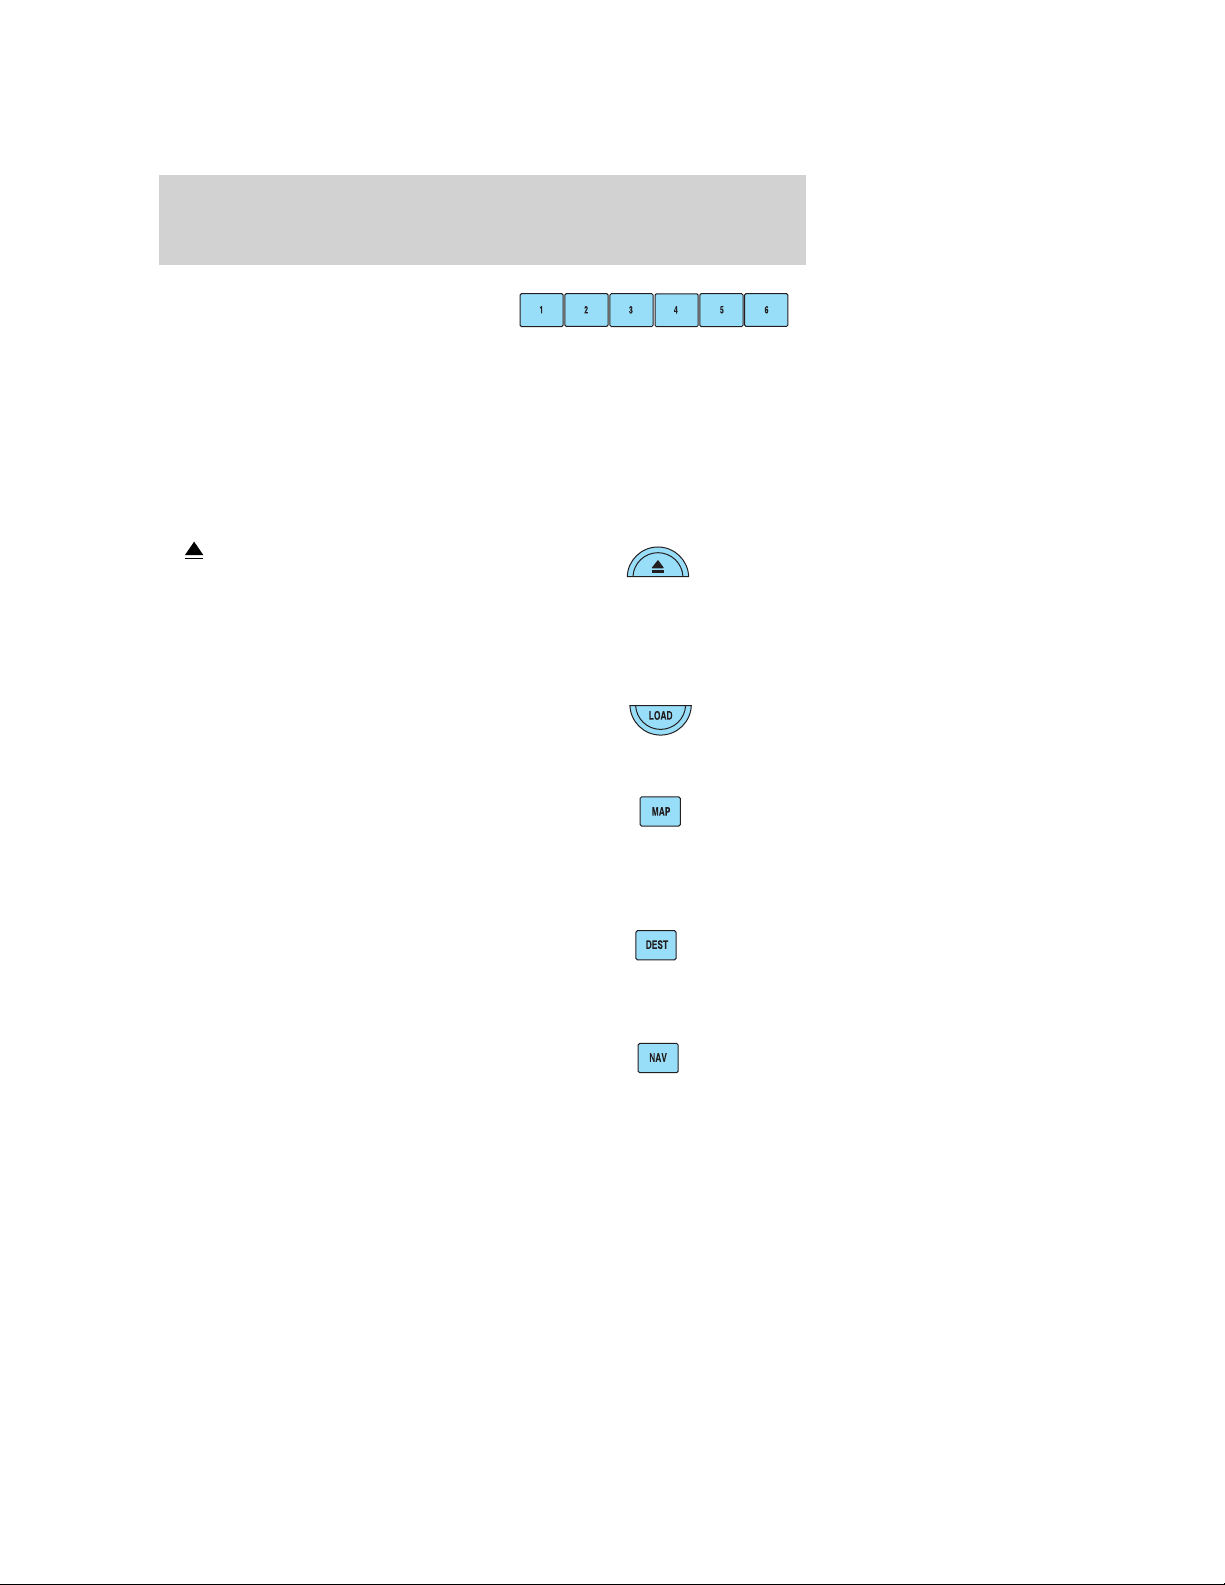
station (AM/FM1/FM2) in radio mode, tune to the selection. Press and hold the desired memory preset button (1–6). Press the memory preset buttons (1-6) to access your preset stations. In CD mode, press the memory preset buttons (1-6) to play the disc in the corresponding slot location.
2. CD slot: To load a CD: Press LOAD and a specific memory preset toload a CD to a specific slot. Once LOAD CD# appears in the display, the CD door will open. Insert the CD label side up.
(Eject): Press the ejectbutton to eject a single disc. Press and hold the button to eject all discs present in the system. To eject a specific disc, press the eject button and then press the corresponding memory preset button. If you do not select a specific disc, the system will automatically eject the disc that is currently playing.
4. LOAD: Press the load button to load a single disc. Press and hold the button to load discs in all empty slot locations. 5. MAP: Press to access thenavigation map. Press while the map display is active to re-center the map on the current vehicle position. Press the button while the map display is active and a route is active to step through the different map guidance views.
6. DEST (Destination): Press toaccess the navigation destination entry menu. Press while in the navigation destination entry menu to show additional destination entry techniques.
7. NAV (Navigation): Press toaccess the navigation menu. Press while in the navigation menu to step through the navigation menu tabs.
2007 (nv1) Supplement USA (fus)
media menu. Press while in the media menu to step through the media menu tabs consisting of various sources.
/ to seek to the / to change the next/previous track. 2007 (nv1) Supplement USA (fus)
the audio system on/off. Press and hold to turn the navigation radio completely off. Turn to adjust the volume of the audio system or the navigation voice prompts as they are being given. Note: If a route is active when the navigation radio is turned off, the route is resumed when the system is turned on again.
After the system initializes, the screen will be divided in two sections:• Status bar: This is the top portion of screen that displays the clock or date and useful information, depending on current mode.
• Display area: The interactive screen that is activated by finger touch and changes depending on current system operation. Graphical buttons are displayed in this area depending on the current screen for the user to make choices.
2007 (nv1) Supplement USA (fus)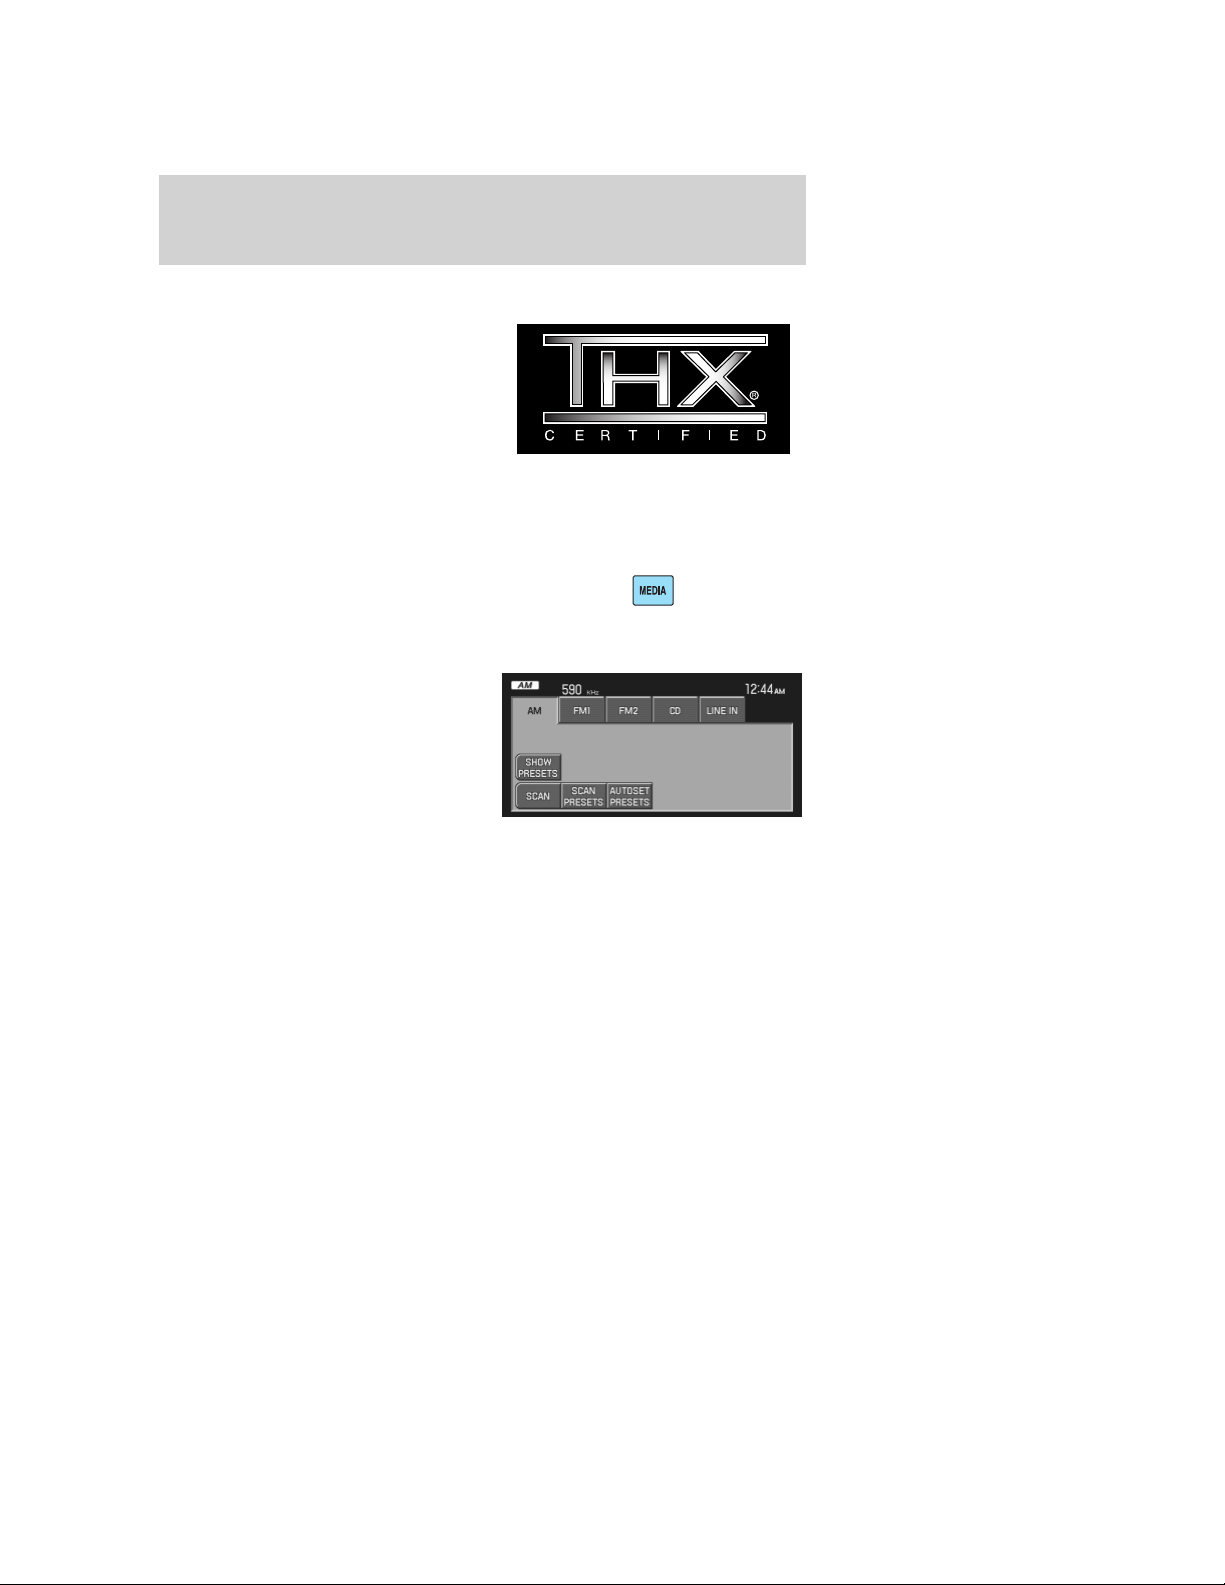
Your vehicle may be equipped with the THX 威 certified premium audio system. This system creates optimal acoustic quality for all seating positions and road conditions.
The system offers an advanced speaker system, amplifier, subwoofer and equalizer. 1. Ensure that the navigation system is on. 2. Press MEDIA. 3. Select AM. Once in AM mode, you may select between SHOW OPTIONS and SHOW PRESETS. 4. Press SHOW OPTIONS to select• SCAN: Press for a brief sampling of all listenable stations. Press again to disable and remain on the current selection.
• SCAN PRESETS: Press for a brief sampling of all the stations held in the memory presets.• AUTOSET PRESETS: The autoset feature allows you to set strong radio stations without losing your original preset stations. This feature is helpful on trips when traveling between cities with different radio stations. To enable, select AUTOSET PRESETS and the six strongest stations in your current area will be set as presets. To return to your original presets, press AUTOSET PRESETS again and the feature will disable.
2007 (nv1) Supplement USA (fus)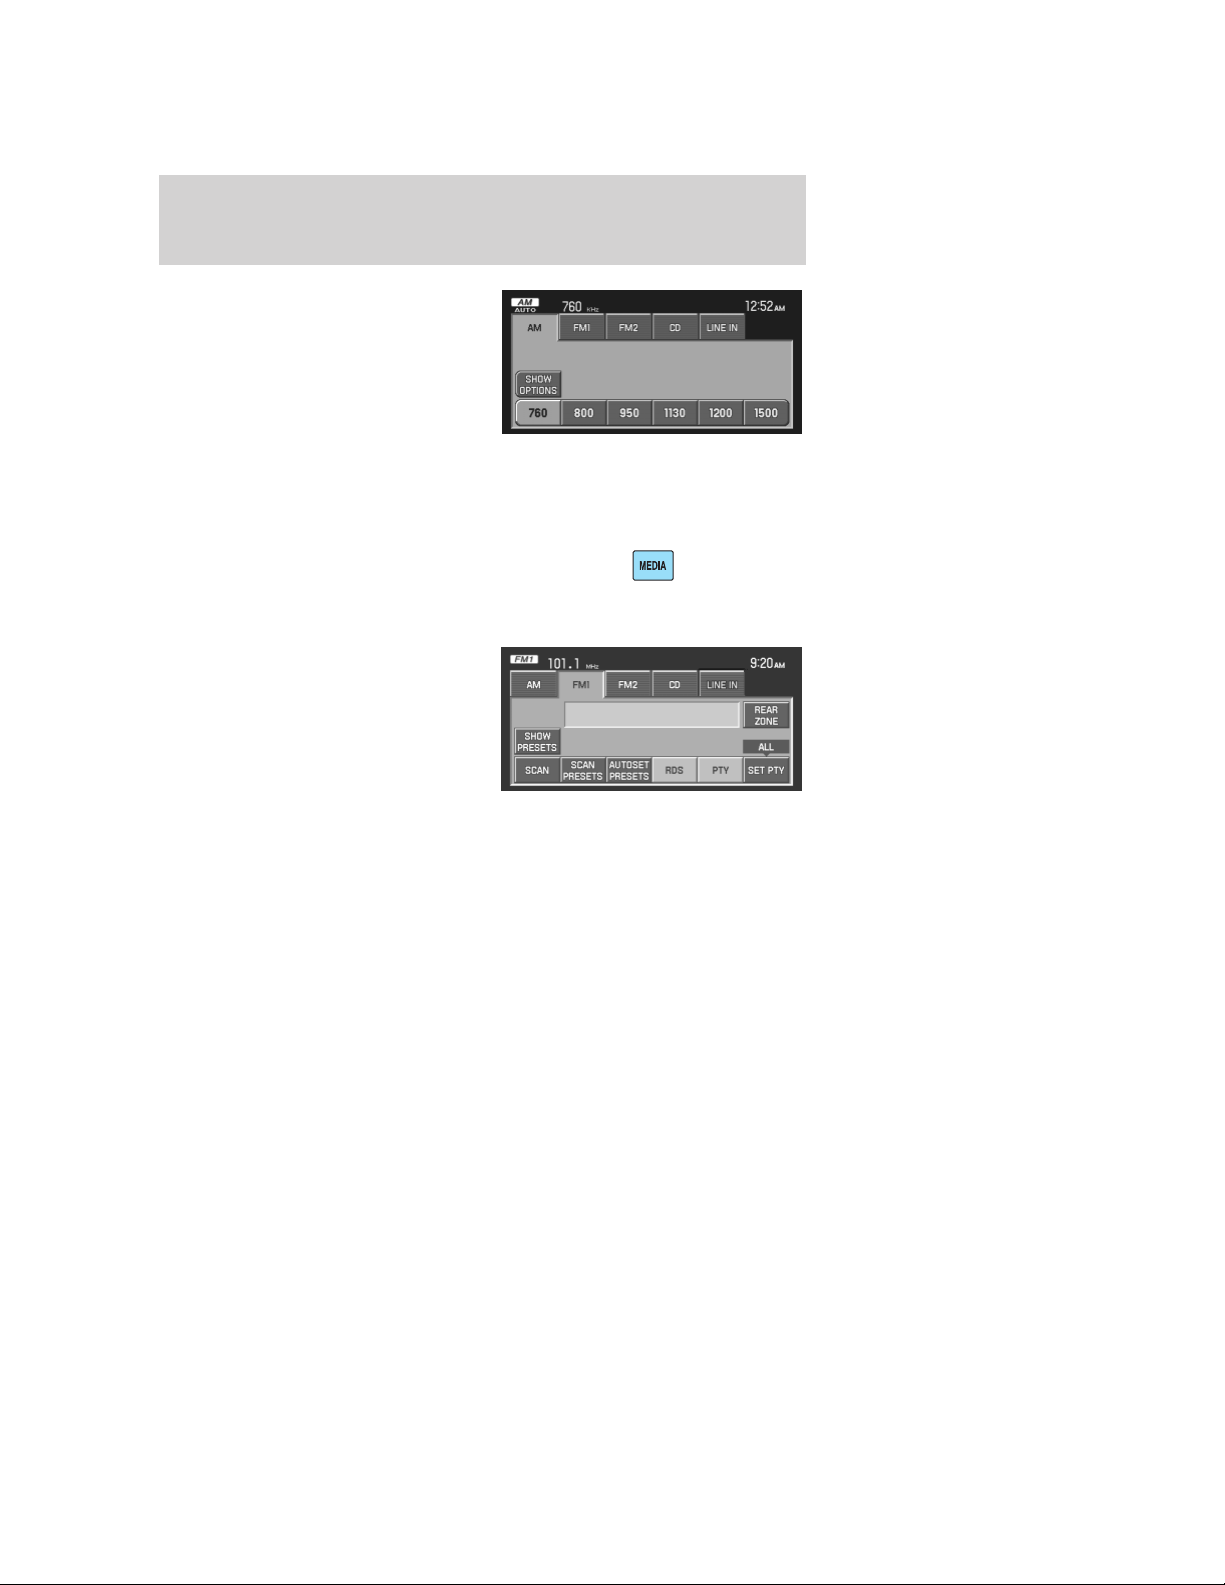
the preset stations. To set or change a preset station, press and hold any of the memory presets buttons (1–6) or any of the soft key memory preset buttons on the screen while on the desired station. The new station will replace the previous one recorded.
1. Ensure that the navigation system is on. 2. Press MEDIA. 3. Select FM1 or FM2. Once in FM mode, you may select between SHOW OPTIONS and SHOW PRESETS. 4. Press SHOW OPTIONS to select• SCAN: Press for a brief sampling of all listenable stations. Press again to disable and remain on the current selection.
• SCAN PRESETS: Press for a brief sampling of all the stations held in the memory presets.• AUTOSET PRESETS: The autoset feature allows you to set strong radio stations without losing your original preset stations. This feature is helpful on trips when traveling between cities with different radio stations. To enable, select AUTOSET PRESETS and the six strongest stations in your current area will be set as presets. To return to your original presets, press AUTOSET PRESETS again and the feature will disable.
• RDS: This feature allows the radio system to receive text information from RDS-equipped FM radio stations. In FM mode, press RDS to activate/deactivate. RDS must be activated in order to access PTY and SET PTY.
• PTY: This feature allows the user to search for Radio Data System (RDS) stations selectively by their program type. To be able to select this feature, RDS must be enabled. PTY and station call letters will be displayed on the Status Bar.
2007 (nv1) Supplement USA (fus)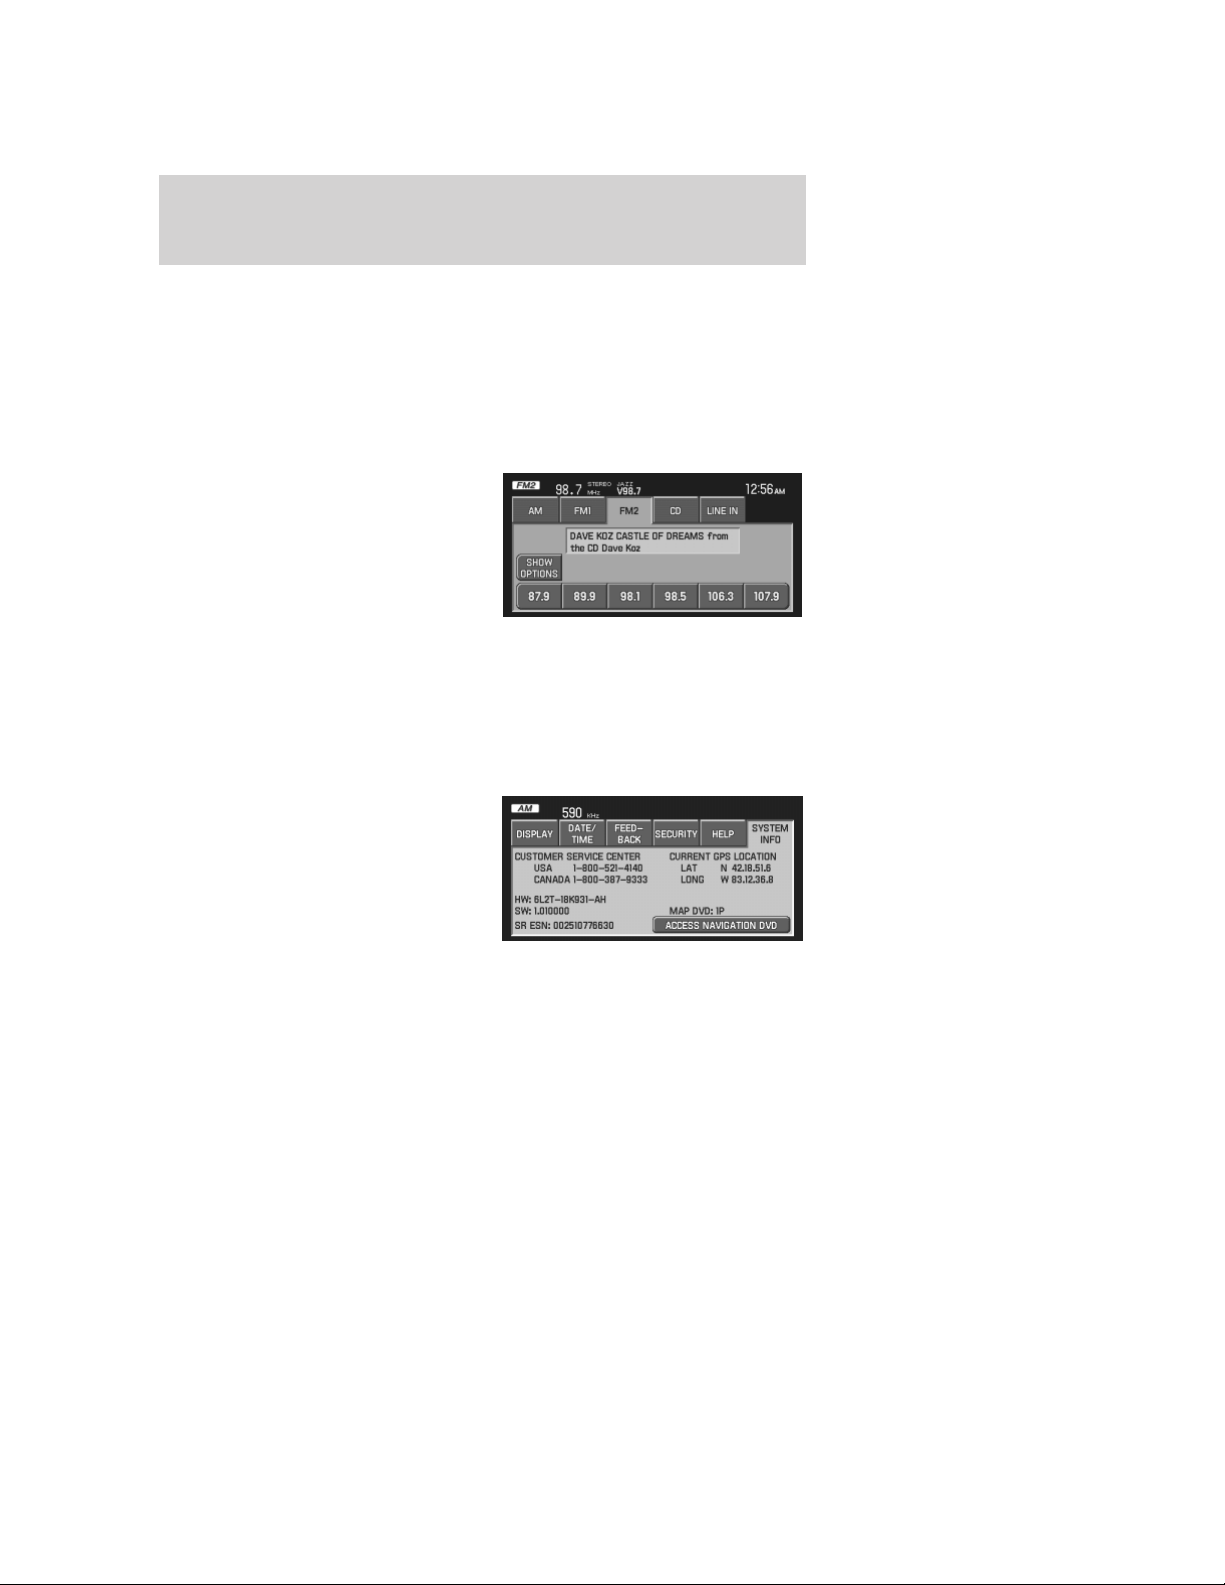
• SET PTY: Press to select a program type, which, once selected, will be displayed above the SET PTY button. Once PTY has been programmed, press SEEK or SCAN to initiate a search up or down the frequency. The search will stop when the desired program type has been reached.
Note: The system will scan the frequency band three times for the chosen program type. If the program type is unavailable in your reception range, the system will return to the previous station.
5. Press SHOW PRESETS to viewthe preset stations. To set or change a preset station, press and hold any of the presets while on the desired station. The new station will replace the previous one recorded.
Your vehicle may be equipped with Satellite Radio capability. Vehicles that are equipped with a factory installed SIRIUS Satellite Radio system include a limited subscription term which begins on the date of sale/ lease of the vehicle. Extended subscription terms are available, please contact SIRIUS at 1–888–539–7474.
You will need to give SIRIUS your Satellite Radio ESN Number for activation. The ESN number is found on the System Information Screen in the lower left corner (SR ESN:XXXXXXXXXXXX). If the SYSTEM INFO screen is not available, press MENU to access the system information.
For further information on satellite subscription and service, refer to Satellite radio information later in this chapter.
2007 (nv1) Supplement USA (fus)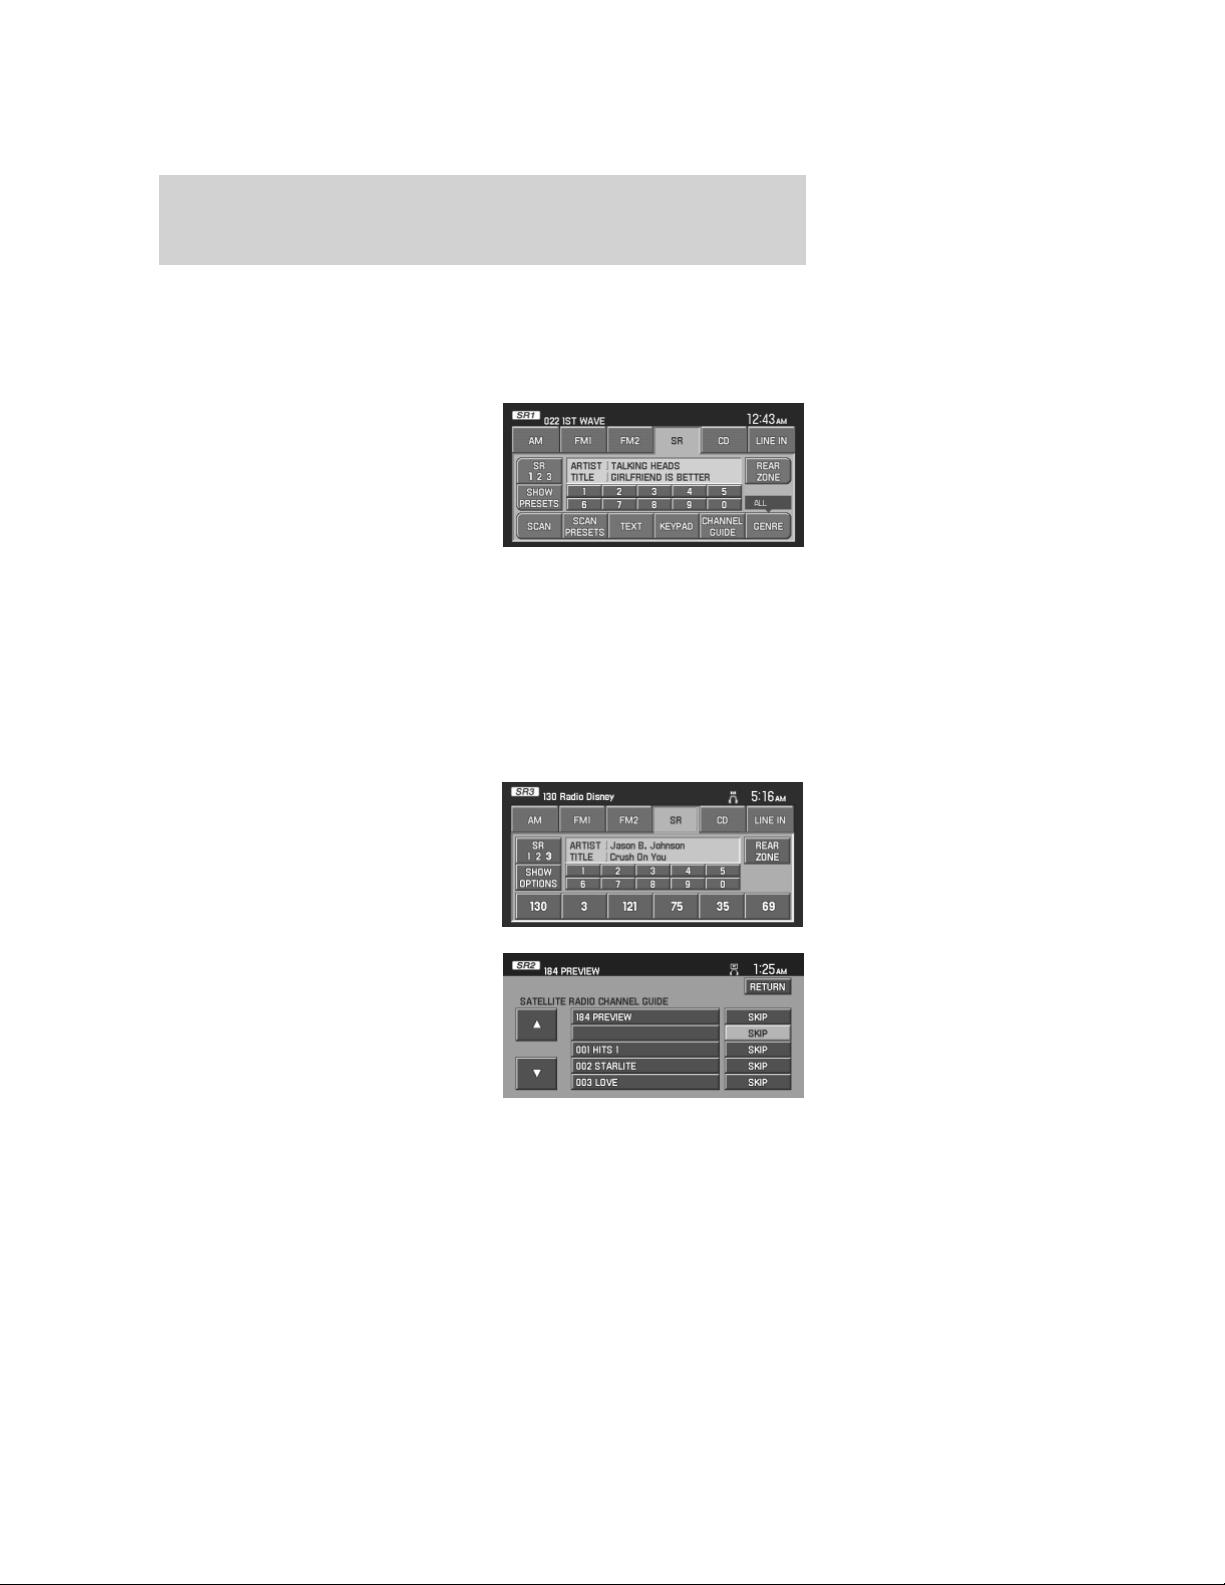
• SR123: You will be able to access three different Satellite Radio bands, SR1, SR2 and SR3. You can save six presets on each band, for a total of 18 presets.
• SCAN: Press to hear a brief sampling of Satellite Radio channels. Press again to stop. When a scan is active, the system will only scan stations available in the selected genre setting.
• SCAN PRESETS: Press to hear a brief sampling of all preset stations. • TEXT: Press once to display artist and title information. Press again to display album and genre information.• KEYPAD: Press to display the numeric keypad (0–9). Use the keypad to manually enter a desired channel. Press ENTER to confirm the selection, or press BACK to delete the entered numbers.
• SHOW PRESETS/SHOW OPTIONS: Press to toggle between displays of the functional buttons or presets at the bottom of the screen.• CHANNEL GUIDE: Press to display the list of satellite radio channels from 1–184. Press the SKIP button located next to the listed channel in order to block that station from being selected when tune, seek or scan searches are active.
Note: You will not be able to scroll through the channel guide when the vehicle is in motion. 2007 (nv1) Supplement USA (fus)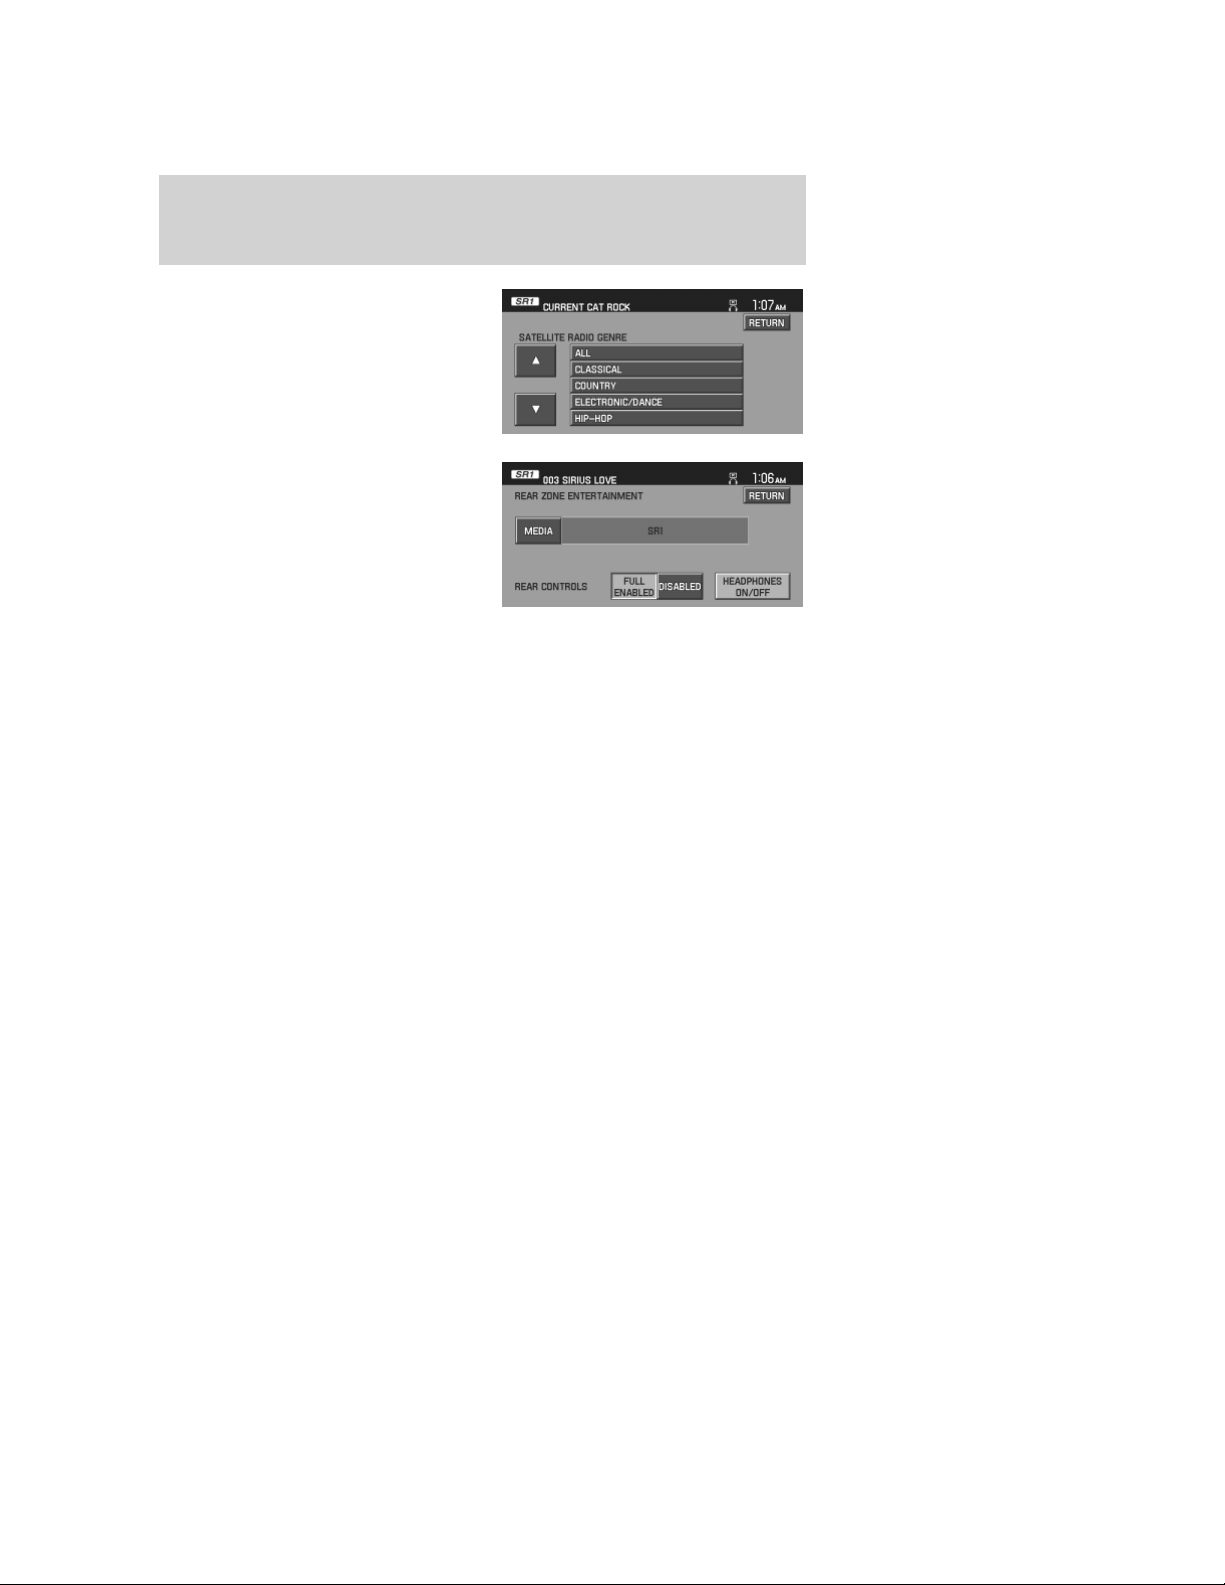
• REAR ZONE: Press to enable/disable the rear controls, turn the headphones on/off and to select from different media sources.
Satellite radio channels: SIRIUS broadcasts a variety of music, news, sports, weather, traffic and entertainment satellite radio channels. For more information and a complete list of SIRIUS satellite radio channels, visit www.sirius.com in the United States, www.sirius-canada.ca in Canada, or call SIRIUS at 1–888–539–7474.
Satellite radio reception factors: To receive the satellite signal, your vehicle has been equipped with a satellite radio antenna located on the roof of your vehicle. The vehicle roof provides the best location for an unobstructed, open view of the sky, a requirement of a satellite radio system. Like AM/FM, there are several factors that can affect satellite radio reception performance:
• Antenna Obstructions: For optimal reception performance, keep the antenna clear of snow and ice build-up and keep luggage and other material as far away from the antenna as possible.
• Terrain: Hills, mountains, tall buildings, bridges, tunnels, freeway overpasses, parking garages, dense tree foliage and thunderstorms can interfere with your reception.
• Station overload: When you pass a ground based broadcast repeating tower, a stronger signal may overtake a weaker one and result in an audio mute.
Unlike AM/FM audible static, you will hear an audio mute when there is a satellite radio signal interference. Your radio display may display NO SIGNAL to indicate the interference.
2007 (nv1) Supplement USA (fus)
SIRIUS satellite radio service: SIRIUS Satellite Radio is a subscription based satellite radio service that broadcasts music, sports, news and entertainment programming. A service fee is required in order to receive SIRIUS service. Vehicles that are equipped with a factory installed SIRIUS Satellite Radio system include:
• Hardware and limited subscription term, which begins on the date of sale or lease of the vehicle.• Online media player providing access to all 65 SIRIUS music channels over the internet (U.S. customers only).
For information on extended subscription terms, contact SIRIUS at 1–888–539–7474.Note: SIRIUS reserves the unrestricted right to change, rearrange, add or delete programming including canceling, moving or adding particular channels, and its prices, at any time, with or without notice to you. Ford Motor Company shall not be responsible for any such programming changes.
Satellite Radio Electronic Serial Number (ESN): This12digit Satellite Serial Number is needed to activate, modify or track your satellite radio account. You will need this number when communicating with SIRIUS. While in Satellite Radio mode, you can view this number by pressing the MENU hard button and then selecting SYSTEM INFO. The number will appear in the bottom left corner of the screen. For further information, please refer to System information in the System features chapter of this navigation supplement.